


Whether you’re going as a pirate, ghost, zombie, or some unholy combination of the three this Halloween, this quick and easy skull tutorial will ensure you have plenty of time left for trick or treating at the end of the evening!
HOT TOPICS
LATEST
Easy Spooky Skull Makeup Tutorial!
Featured Products


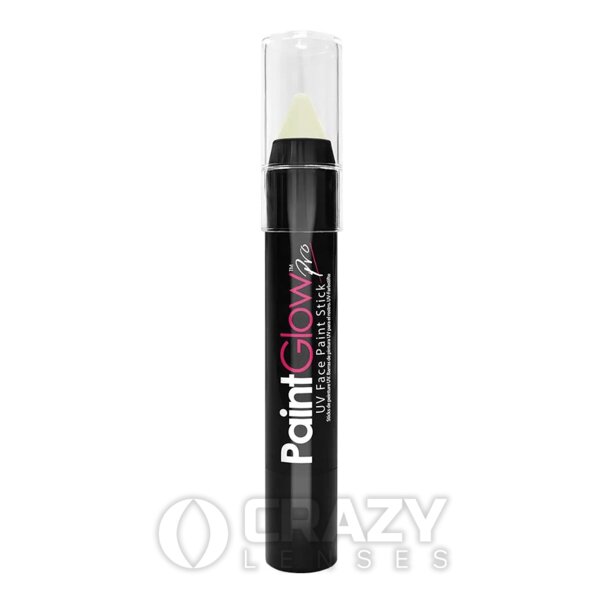

For a classic and traditional skull and crossbones face paint, start with a white base. This can be foundation or face paint, whichever you may already have on hand or are most likely to use again! We have a creamy, smooth Stargazer White Foundation, perfect for any goth or a person who likes more alternative makeup. We also have Paintglow UV White Face & Body Paint available, which appears like a normal white face paint under regular lighting, but will add a unique edge and fun twist to your costume once you step into a UV light.
Try to get this base down evenly, and we’d recommend letting it dry fully before moving on to step two. This allows you to check if there are any missed spots or patchiness that could be addressed with a second layer; it's much easier to achieve and do if there’s still only one colour on your face. It also prevents any other secondary pigments placed on the skin mixing with your crisp white base to form a muddy colour and smudged lines.
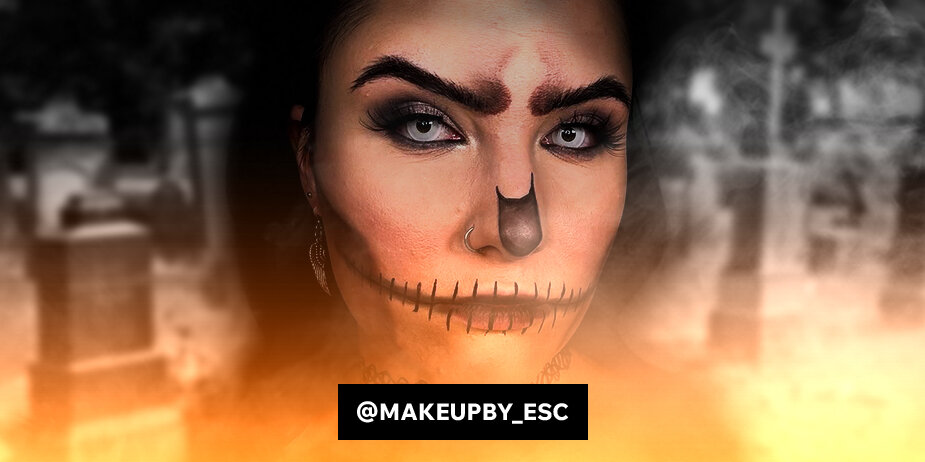
Once the base is dry (so this may take slightly longer than if you have to apply a second layer), it's time to start our skull art! @makeupby_esc has shared a video tutorial on how to create an easy skull makeup look as part 3 of a short Halloween series on her page; for her other tutorials, with plenty of tips and tricks on how to create a seamless Halloween costume makeup this year, make sure to check her Instagram!
In her ‘Easy Skull Look’, @makeupby_esc has a regular foundation base, and begins the skull part of her look by adding a brown pencil liner to the cheek. Start fairly high up the cheek, slightly above where you would typically contour, but follow the natural line to around halfway across the cheek. Then, curve the line downwards, ending at the jawline. To further emphasise the sharpness of the contour, reverse the shape of the curve, approximately in line with the mouth, to curl inwards the chin. Doing your lines in a soft liner pencil or eyeshadow is ideal, as it can often be easily blended out or removed if any mistakes are made. If you have a white base, we recommend using a lightly coloured eye shadow or pencil to blend in more.
Once you have your lines mapped out, you can start adding shading under the line and blending downward. For a clean, sharp line, make sure to blend downwards. Pack the pigment near the lines you’ve just drawn out in order to create a strong juxtaposition and the appearance of a strong shadow on the cheek. Blend and darken until you’re satisfied; remember, this is supposed to look fairly harsh, so it’s not too much of a concern if it’s not beautifully blended!
Then, @makeupby_esc moves on to adding the lines for teeth across her mouth. Erin uses a black liquid liner pen, which allows a fair amount of control but would be unforgiving of any mistakes. If you’re a little nervous about freehanding this section, we recommend once again using a pencil first to map out all your lines before you go back in with liquid liner or face paint. @makeupby_esc brings the line all the way out to approximately halfway across the cheek, crossing the lines made earlier on the cheek at the point where they begin to curve in the opposite direction towards the chin.
@makeupby_esc follows this by moving on to cover the nose. She outlines the ‘hole’ first, and then fills it in with a thicker black outline and grey shading in the centre. Following the natural lines of your nose will help you create a more realistic-looking hole for the cartilage, and also double up as contour. Allow the lines to extend up the nose, providing some extra contouring!
Moving upwards to the eyes, @makeupby_esc uses her brown pencil liner again to extend the inner corners of her brows, emphasising the brow bone. Similar to a backwards ‘S’-shape, Erin brings the line slightly out before curving up; once past the top of the brow, the line begins to curve back the other way to meet in the centre. Leave the top part of the backwards ‘S’ to ensure you leave a small gap between the top two halves so they don’t actually connect. Once again, blend outwards, leaving the centre spot clear. To further emphasise the centre and darken the shading, add a dab of lighter concealer to the centre of the space left on the forehead and blend with a separate, clean brush to avoid cross-contamination muddying the colours.
A smoky eye with a dash of shimmer is the perfect way to glamourise this easy Halloween makeup look for a night out. Keep it simple, @makeupby_esc uses the same shades and tones as in the rest of the makeup to keep everything feeling cohesive and connected. For the perfect smoky eye, Erin applies a medium-light shade of grey in a wash across the upper lip. Then, build up the shadows in the outer corner of the eye, following the natural shape of your lid to create shadows on the edge and just above the crease for the optimum smoked-out glam look. Either keep using the same shade of grey, slowly building more and more depth, or use a complementary but slightly darker hue. Ensure you blend well - the best part of a smokey is that it can look a little messy yet still glamorous, as long as everything is all smudged and blended out! Finally, add glitter to the centre of the lid and inner corner, bringing some brightness back to your appearance.
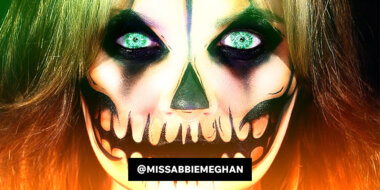
If you’d like to take your dark smoky eye a step further, add black eyeliner to your waterline before applying mascara (or false lashes, depending on your preference). Finally, @makeupby_esc adds the White Zombie contact lenses, taking this fantastic yet simple makeup look a step further and elevating it from basic to eye-catching! Paired with the silver sparkles added to the inner corner and lid, these white contact lenses perfect the skull look with a hollowed-out appearance.
A pair of black contact lenses will also help you achieve a hollow and vacant look, the dark colour perfect for a skull and crossbones makeup. We would recommend our bestselling Black Blackout contact lenses for a comfortable and cheap pair of disposable contact lenses, ideal for a one-off costume or evening, such as Halloween night. Remember, you shouldn’t wear your contact lenses for more than eight hours consecutively to avoid drying out or irritating your eyes. Once disposable contact lenses have been worn, it is imperative that they are thrown away.
Our Mini Sclera contact lenses are available in either black or white (or even red), and their larger diameter is great for a dramatic effect. These lenses completely cover the iris and even part of the sclera, so they’re great for a make-up look or a costume where you don’t want your eyes to appear human! The black or white lens would be great for helping achieve a ‘hollow’ skull appearance.
If you want to check out more of @makeupby_esc’s tutorials, check out her latex peel makeup tutorial, or check out her Instagram for the rest of her Halloween series: @makeupby_esc. If you recreate this skull look and follow this amazing tutorial by @makeupby_esc, tag us @crazylensesnow on our socials so we can see what lenses you decide to use with your quick and easy Halloween skull makeup!